How to Apply Stickers Without Air Bubbles
Customized stickers online offer a fantastic way to personalize your belongings, advertise your brand, or simply add a touch of creativity to various surfaces. However, applying these stickers without air bubbles can be a challenge, especially if you’re new to the process. Air bubbles not only mar the appearance of your stickers but can also affect their adhesion and longevity. In this guide, we’ll walk you through the steps to ensure a smooth application of your customized stickers, leaving your surfaces looking flawless.
Understanding Sticker Application
Before diving into the nitty-gritty of bubble-free application, it’s important to understand why air bubbles occur in the first place. Stickers typically consist of three layers: the backing paper, the adhesive layer, and the sticker design itself. When you peel off the backing paper and apply the sticker, air can get trapped between the adhesive and the surface, causing unsightly bubbles.
Preparation is Key1. Choose the Right Surface
The first step to a successful sticker application is selecting an appropriate surface. Stickers adhere best to clean, smooth surfaces. Avoid applying stickers to surfaces that are textured, dirty, or oily, as these conditions can lead to poor adhesion and more bubbles.
2. Clean the Surface Thoroughly
Ensure the surface where you’ll apply the sticker is completely clean. Use a mild soap and water solution to wipe it down, followed by a dry cloth. For extra caution, you can use rubbing alcohol to remove any remaining residue or oils. Allow the surface to dry completely before proceeding.
3. Gather the Necessary Tools
Having the right tools on hand can make a significant difference. For a bubble-free application, you'll need:
- A squeegee or a credit card
- A sharp utility knife or scissors (for trimming)
- A clean, lint-free cloth
Applying the Sticker1. Position the Sticker
Carefully position your customized sticker online where you want it to be applied. It’s often helpful to lightly place the sticker on the surface without peeling the backing completely to ensure you have it aligned correctly. Once you're satisfied with the position, you can proceed with the full application.
2. Peel Back the Backing Paper
Slowly peel away the backing paper from one corner of the sticker. Be cautious to avoid touching the adhesive side as much as possible to prevent transferring oils from your fingers onto the sticker.
3. Apply the Sticker Gradually
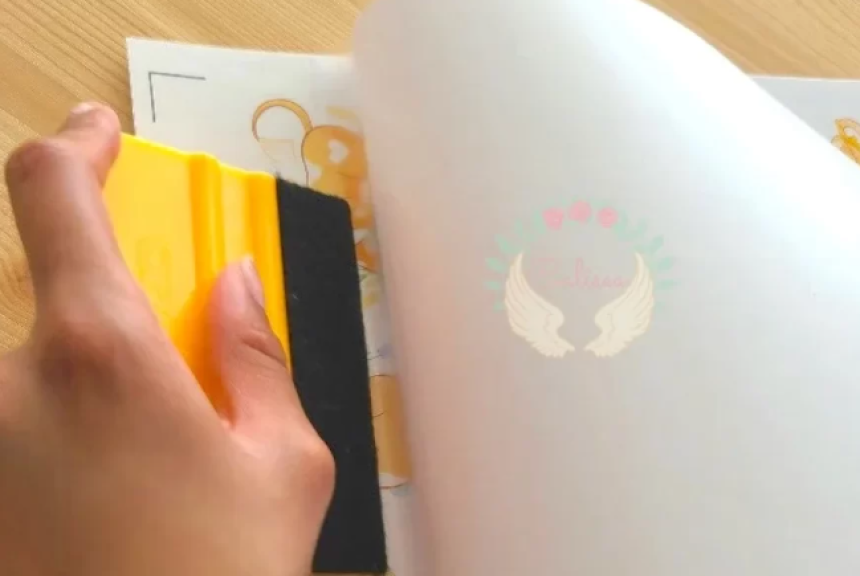
As you peel back the backing paper, start applying the sticker to the surface. Use a squeegee or a credit card to gently press the sticker down as you go, working from the center outwards. This technique helps push out any air bubbles that may form.
4. Smooth Out the Sticker
Once the entire sticker is in place, use the squeegee or credit card to go over the entire surface again. Apply firm, even pressure to ensure the sticker adheres well and any remaining air bubbles are pushed out. For stubborn bubbles, you can gently lift the sticker and reapply it, smoothing out the bubbles as you go.
Dealing with Air Bubbles1. Using a Pin or Needle
If you encounter small air bubbles after application, you can use a pin or needle to pop them. Gently pierce the center of each bubble and use the squeegee or your finger to smooth out the area. Be careful not to tear or damage the sticker.
2. Reheat and Reapply
For larger bubbles or stickers that are not adhering properly, using a heat source can be effective. Warm up the sticker with a hairdryer on a low setting for a few seconds. This makes the adhesive more pliable, allowing you to smooth out the bubbles more easily. After reheating, use the squeegee to press the sticker down firmly.
Post-Application Care1. Avoid Immediate Contact
After applying your customized sticker, avoid touching or disturbing it for at least 24 hours. This allows the adhesive to set properly and ensures a strong bond with the surface.
2. Clean the Sticker Gently
To keep your sticker looking fresh, clean it gently with a soft, damp cloth. Avoid using abrasive cleaners or scrubbing vigorously, as this can damage the sticker or lift its edges.
3. Check for Edge Lifting
Over time, stickers can start to lift at the edges, especially if they’re exposed to moisture or high temperatures. If you notice this happening, use a small amount of adhesive or glue to secure the edges back down.
Troubleshooting Common Issues1. Sticker Doesn’t Stick
If your sticker isn’t sticking properly, it may be due to a surface that wasn’t adequately cleaned or an adhesive issue. Make sure the surface was thoroughly cleaned and consider using a different type of adhesive if necessary.
2. Bubbles Persist Despite Efforts
Sometimes, bubbles may persist despite your best efforts. If this happens, you might need to carefully lift the sticker and reapply it, taking extra care to smooth out the bubbles as you go.
Tips for Future Applications1. Practice Makes Perfect
The more you apply stickers, the better you’ll get at it. Practice on smaller or less critical surfaces to build your confidence and technique.
2. Invest in Quality Stickers
High-quality stickers with better adhesives tend to apply more smoothly and are less prone to bubbling. When ordering customized stickers online, opt for reputable suppliers who offer high-quality materials.
3. Use Application Tools
Consider using application tools like transfer tapes or applicator kits, which can help with precise placement and reduce the likelihood of air bubbles.
Conclusion
Applying customized stickers online without air bubbles might seem daunting at first, but with the right preparation and technique, you can achieve a smooth, professional-looking result. Remember to prepare your surface, use the right tools, and apply the sticker gradually while smoothing out any bubbles. With practice and patience, you'll master the art of sticker application and enjoy the personalized touch that customized stickers bring to your life.


